
The forgotten Middle Eastern front in WWI
The First World War is often remembered as a conflict that took place in the wet and cold conditions on the western front in northern France.
However, there were significant battles that also occurred in Egypt and the Middle East, in far drier and hotter conditions than the western front.
This theatre of the war was fought mostly between the British forces located in Egypt and the Turkish Ottoman forces located in modern Turkey, Israel, and Palestine.
Why WWI was fought in the Middle East
The Ottoman Empire joined WWI as a German ally in October 1914, and was therefore at war with Russia, to its north, as well as France and Britain.
In early 1915, the Turkish army attacked the Suez Canal in British-controlled Egypt.
The Ottoman forces were composed mainly of Arab units, led by a German commander called Kress von Kressenstein.
During the assault on the Suez Canal, the British forces successfully repelled the attackers.
However, they didn't pursue the defeated Ottoman forces because of the size of the Sinai Desert that they had to cross in order to reach Palestine.
Following this, very little happened in the region for the rest of 1915, as British forces based in Egypt were used in the failed Gallipoli landings from April to December of that year.
However, due to the final withdrawal of the British forces from Gallipoli in December 1915, there was an influx of manpower back into Egypt to prepare for an assault on the Ottoman-controlled regions in the Middle East.
Middle East campaign begins
In January 1916, the British Army created a new army called the Egypt Expeditionary Force.
It was led by the British General Sir Archibald Murray. The most famous units that made up this force included the Australian Light Horse and the New Zealand Mounted Rifles.
Murray started his time in command by planning an attack on the Ottoman Empire that would take the British forces along the Mediterranean coastline.
This could keep him in contact with supplies by ship and rail while passing through the harsh desert environment.
This environment meant that the most important resource during the entire campaign would be water, as the men and horses needed daily access to clean drinking water.
The first operation that Australian troops were involved in was a reconnaissance mission on Wady um Muksheib on the 21st of March 1916.
This was then followed by an attack on the 13th of April, which led to the capture of Jifjapa.
Another British unit failed to capture Romani, which was held by a Turkish army led by von Kressenstein.
A new unit, called the ANZAC Mounted Division was formed, which was led by Australian Major General Harry Chauvel.
This new unit helped recapture Romani by 5th August.
For the rest of 1916, and into 1917, the British forces continued to advance north, capturing towns as they went.
However, access to water became the main concern over which settlements they took and when.
In early 1917, the British forces failed to capture the major port city of Gaza in two separate battles.
During several months where little fighting took place, the Ottoman forces strengthened their defenses and communications capabilities in the region.
Battle of Beersheba
To try and break the stalemate around Gaza, an attack was planned on the inland settlement of Beersheba (modern Be'er Sheva).
This battle would become an important turning point in this campaign.
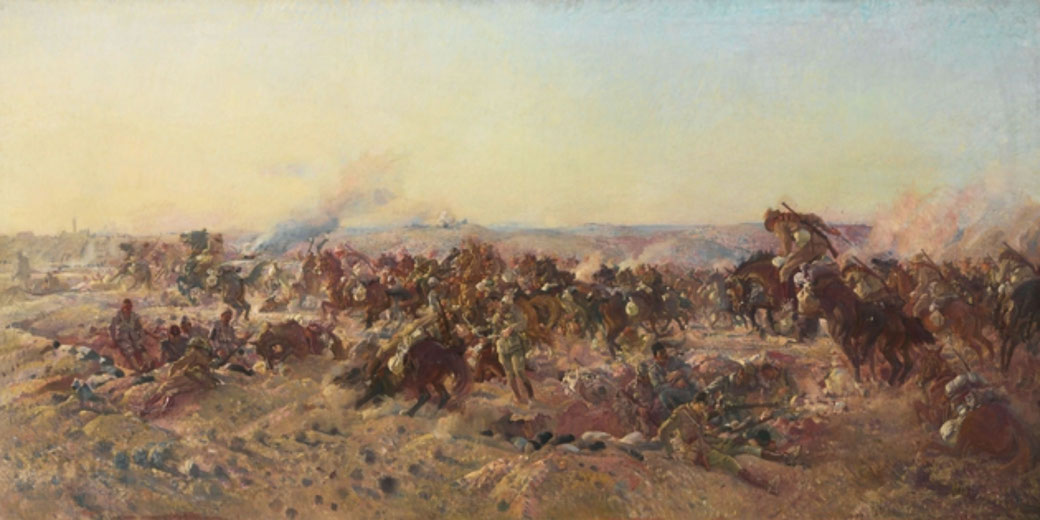
On the night of the 30th of October 1917, British forces undertook a surprise nighttime march towards the town.
At dawn on the 31st of October, artillery bombarded Beersheba's 5 kilometres of Turkish trenches.
British troops were then able to capture the outer town defenses by midday.
Then, the ANZAC Mounted Division moved around to the south-east and east of Beersheba and the 2nd Light Horse Brigade took a key road to the north.
However, the Turkish defenders held on and, by 3pm, it looked as if the attack might fail.
As time was running out, and the British forces needed access to the water wells in the town before dark, Chauvel ordered the 4th Light Horse Brigade to make a direct charge on the town.
Chauvel was aware that the Turkish trenches were not protected by barbed wire.
At 4:50pm, the brigade charged for 6 kilometres to reach Beersheba. This was the first time that Australian Light Horse was used as a proper cavalry division, rather than an infantry division.
The attack began as a trot, and then a gallop, a speed that was too fast for Turkish artillery to target.
At 3 kilometres from the town, machineguns fired at the horsemen, but supporting British artillery successfully neutralised them.
Once at the edge of town, the Light Horse unit jumped the first trench and then the main trench, before some soldiers dismounted and attacked with rifles and bayonets.
Other horsemen continued on and captured the final line of trenches before the rest captured the centre of Beersheba.
The Australian casualties amounted to thirty-one killed and thirty-six wounded, while they captured over 700 Ottoman combatants.
The victory at the Battle of Beersheba turned the entire Turkish defensive line, leading to the eventual capture of Gaza on the 8th of November and Jerusalem on the 30th of December 1917.
Following Beersheba, the Ottoman empire was in a much weaker position, and it would never again have the resources it needed to successfully counterattack.
When the First World War ended at the end of 1918, the Ottoman Empire would cease to exist, and the British empire would control how its former Middle Eastern territories would be governed.