
How to build a medieval castle: A step-by-step guide
Building a medieval castle required an enormous investment of time and labour supported by a large sum of money. A large stone castle could take ten to twenty years to complete. Each phase demanded careful coordination.
When finished, the castle was designed to withstand siege warfare and to show the lord’s power over the land. Some, such as Dover Castle, had walls of extraordinary thickness and multiple concentric layers of defence. The total cost could go over £10,000 to £20,000, a fortune in the thirteenth century.
The following step-by-step guide explains how medieval castles were built from the ground up, using specific historical practices taken from records across Europe.
1. Choosing the Location
Before any tools touched the earth, the castle’s future location had to be selected.
Lords favoured elevated ground such as hills, cliffs, or rocky promontories that provided strong defensive advantage and wide visibility over surrounding lands.
Access to fresh water, woodlands, and roads was also essential. In some cases, builders reused Roman sites or early motte-and-bailey structures, which already offered raised ground and strategic positioning.
Natural features like rivers or marshes were factored into the design for additional protection.
For instance, Edinburgh Castle was built atop a volcanic rock, while Château Gaillard, built by Richard the Lionheart in the late twelfth century, overlooked a bend in the Seine, which allowed the garrison to watch river traffic and to resist invasion.
2. Drawing the Design
Once the site had been chosen, the lord and his chosen master mason began drawing detailed plans for the castle.
Parchment designs included the central keep, curtain walls, gatehouse, towers, moats, and internal buildings.
The plan included both defence and daily life needs. The keep served as the last line of defence and the lord’s residence.
Curtain walls enclosed the inner and outer baileys, while towers allowed defenders to protect every angle. Spaces were allocated for halls, chapels, granaries, and stables.
Notable master masons, such as James of Saint George, were employed by monarchs like Edward I to construct castles across Wales, which featured carefully organised concentric plans influenced by Crusader fortresses such as Krak des Chevaliers.
3. Laying the Foundations
After the design phase, labourers cleared trees, rocks, and topsoil to prepare the ground.
Trenches were dug according to the shape and size of the walls and towers.
Builders aimed to reach firm bedrock, or at least compact subsoil, to prevent collapse.
Into these trenches, they placed large unshaped stones or rubble to form a solid base.
This early work had to support massive stone walls that might rise up to 12 metres high and several metres thick.
Pickaxes, mattocks, and wooden shovels were used to dig and shape the earth, and the soil was tamped down to ensure stability.
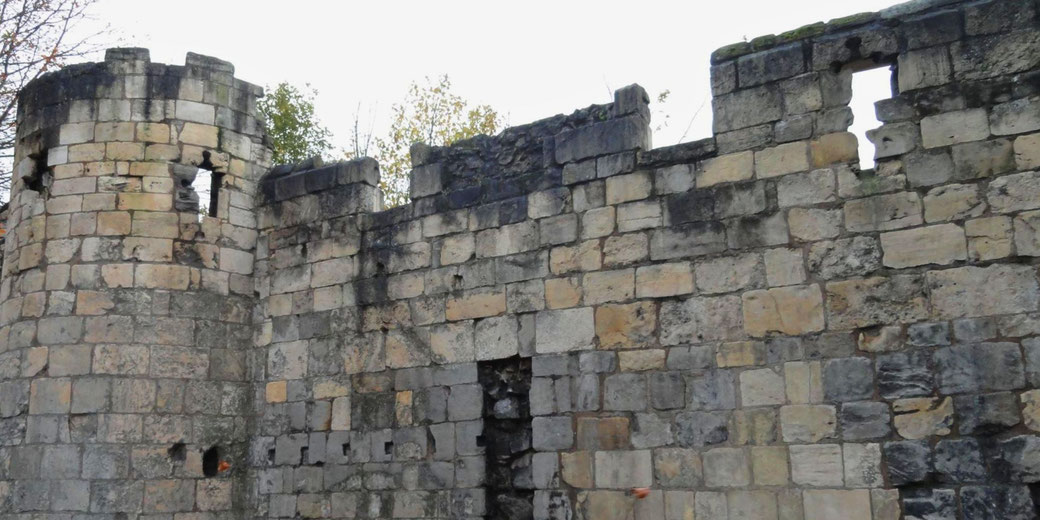
4. Building the Stone Walls
With the foundations complete, construction of the walls could begin. Masons stacked cut stones in horizontal layers called courses.
Outer layers used smooth ashlar blocks, while the centre was packed with rubble and mortar.
Lime mortar, which was made by burning limestone and mixing it with sand and water, held the stones together.
Wall thickness changed based on the castle’s use and how much its owner could afford.
Some fortresses, particularly major royal ones, had walls that could exceed 5 metres in thickness, though more commonly walls ranged between 2 and 4 metres thick.
Workers built wooden scaffolding and used pulleys or treadwheel cranes to hoist stones into place.
Wall construction typically paused during the winter months, as lime mortar needed warm weather to dry correctly.
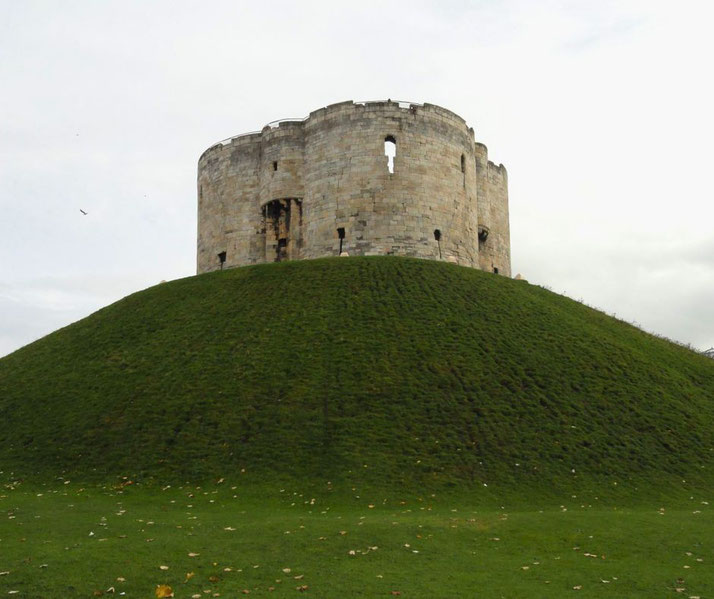
5. Constructing the Keep
The keep was often the first major structure to be completed. Usually located at the highest point, it acted as a final refuge and the lord’s main residence.
Its walls were thicker than the curtain wall, and some keeps had their own well, food stores, and chapel.
Interiors included a great hall, private chambers, storage cellars, and rooftop fighting platforms.
Spiral staircases were built within the wall thickness to conserve space and improve security. Narrow arrow slits allowed archers to defend against attackers from within.
At the Tower of London, the massive White Tower served both as a stronghold and royal accommodation, with its main entrance originally placed about 4.5 metres above ground and accessed by a removable wooden staircase for added security.
6. Adding Towers and Battlements
Defensive towers were built at corners and intervals along the curtain walls.
Round towers offered better protection than square ones because they caused missiles to bounce off and were harder to undercut.
Towers were constructed with multiple storeys, including basements for storage or prisons.
Masons added crenellations, alternating high and low sections, along the tops of towers and walls to shield defenders.
These battlements included merlons for cover and crenels for firing arrows. Wall walks ran behind these battlements, which gave archers space to move during an attack.
Some castles added machicolations, projecting stone galleries with openings through which defenders could drop rocks or boiling liquids directly down onto attackers.
7. Building the Gatehouse and Drawbridge
The gatehouse became one of the most fortified parts of the castle. It controlled the main entrance and featured thick doors, a portcullis, and arrow slits.
Many gatehouses had murder holes in the ceiling of the passageway, allowing defenders to drop rocks or boiling liquids on invaders.
A wooden drawbridge could be raised to block access over a moat or ditch. Some castles added secondary gates, known as posterns, for use by messengers or supply wagons during sieges.
Gatehouses like the one at Harlech Castle employed twin D-shaped towers and a strong approach to delay and trap attackers.
Counterweight systems or chains helped to operate heavy drawbridges efficiently.
8. Digging the Moat and Strengthening the Defences
Labourers often dug a deep ditch around the castle. In wetter areas, this became a water-filled moat.
In dry areas, it formed a steep-sided dry ditch. Builders diverted nearby streams to fill moats when possible.
The moat acted as a barrier to siege towers, battering rams, and tunnellers. Stakes or wooden palisades were added around the outside.
In some cases, earth removed from the ditch was piled to form a glacis, a sloped embankment that made wall scaling harder.
Moats typically measured between 3 and 5 metres deep and could span up to 15 metres wide, though dimensions varied significantly depending on the site and purpose.
9. Completing Internal Buildings
Within the inner bailey, masons and carpenters constructed buildings for daily life.
The great hall became the social centre, where feasts, court sessions, and assemblies took place.
Kitchens with massive fireplaces prepared food for the garrison and household. Chapels provided space for worship.
Stables, workshops, smithies, and storage buildings lined the walls. Floors were packed earth or covered in tiles.
Roofs were made from timber beams and covered with slate, tiles, or wooden shingles.
Sanitation needs were met by garderobes, small latrines built into the walls or projecting over the moat to remove waste.
10. Installing Finishing Touches
After the stonework finished, skilled craftsmen completed the castle’s interior and exterior details.
Blacksmiths forged door hinges, locks, latches, and grilles. Carpenters fitted wooden doors and window shutters.
Roofers sealed joints with lead flashing. Painters and glaziers decorated chapels and windows with coloured glass or painted frescoes.
Some castles displayed the lord’s coat of arms carved in stone or painted above doorways.
Decorative work was carried out by stonemasons, tilers, and apprentices, who carved capitals, bosses, and corbels.
At castles such as Doué-la-Fontaine, which featured one of the earliest stone keeps in France, later additions may have included painted chapels and coloured windows that added splendour to otherwise stark interiors.
What do you need help with?
Download ready-to-use digital learning resources


Copyright © History Skills 2014-2025.
Contact via email