How much was Churchill to blame for the disaster at Gallipoli?

When Allied troops landed on the Gallipoli peninsula on 25 April 1915, they entered a campaign that British officials had promised would be swift and strategically important, with a clear victory to follow.
The operation aimed to eliminate the Ottoman Empire from the war and secure a sea route to Russia, which would then let the Allies pressure Germany from a new direction.
Instead, it collapsed into a grinding and costly failure that left just under 250,000 Allied casualties, no territorial gains, and a damaged reputation for the man who had championed the idea, Winston Churchill.
As First Lord of the Admiralty, he proposed the strategy and insisted upon its urgency, but the outcome raised a much larger question about whether his role justified the blame he received or whether the operation faltered for underlying structural reasons within British military planning.
What was the Gallipoli Campaign of WWI?
The Gallipoli Campaign took place between April 1915 and January 1916 and formed part of an Allied attempt to break the deadlock of trench warfare in Western Europe.
Military and political leaders in Britain and France had approved an eastern attack against the Ottoman Empire, a move that aimed to weaken a less powerful member of the Central Powers and open the Dardanelles Strait again for Russian supply lines.
By doing so, they aimed to encourage some Balkan states to support the Allies and shift the strategic balance of the war.
Initially, the plan relied mainly on naval strength alone. On 19 February 1915, Allied battleships began shelling Ottoman coastal defences in the Dardanelles.
Commanders had expected that continued naval fire would likely destroy enemy artillery and allow minesweepers to clear a path.
However, Ottoman resistance proved stronger than most Allied planners expected.
On 18 March, mines destroyed HMS Irresistible and HMS Ocean, then sank the French battleship Bouvet, and damaged others, which forced a retreat before the strait could be secured.
As a result, the campaign shifted from a naval-only operation to a combined land and sea attack.
Allied leaders had approved a landing on the Gallipoli peninsula to seize control of high ground and eliminate the Ottoman positions that threatened Allied ships.
So, on 25 April 1915, about 35,000 troops from Britain, Australia, New Zealand, and France began their landings, with further reinforcements that arrived in the following days, so they could advance inland quickly.
However, the terrain proved rough and poorly mapped, while Ottoman defences, especially those under Mustafa Kemal, held firm and caused heavy casualties in the first days.
The Ottoman Fifth Army was commanded by German general Liman von Sanders and had prepared a defence system in depth that used the ground well.
After nine months of limited movement that went with constant disease and a run of failed offensives, the Allies withdrew in early January 1916 without securing a single key objective.
Total Ottoman casualties roughly equalled those of the Allies, which meant that each side suffered more than 250,000 losses.
What was Churchill's role?
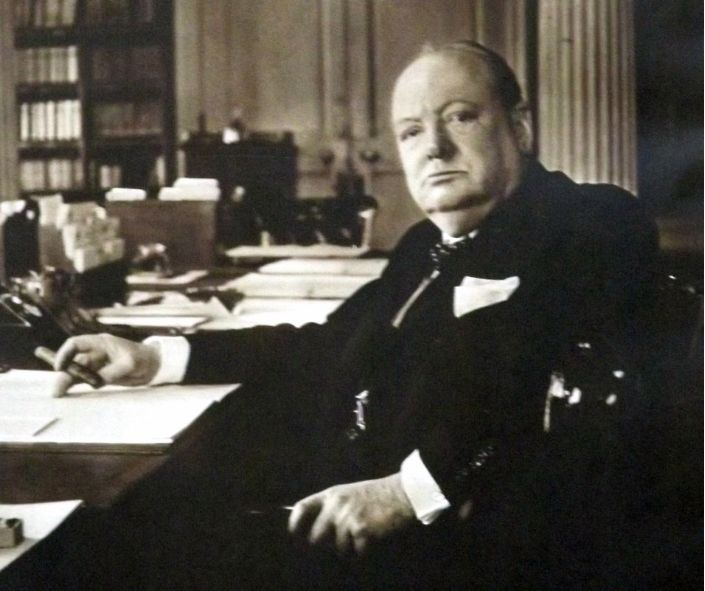
As First Lord of the Admiralty, Churchill directed strategy for Royal Navy operations and took a leading role in proposing an attack on the Dardanelles.
By November 1914, he had begun sharing plans for a naval strike against the Ottoman Empire.
He argued that a display of force in the east could shorten the war. He viewed the Ottomans as militarily weak and believed that success at Gallipoli would both strengthen Russia’s position and allow the Allies to pressure Germany on multiple fronts.
From the outset, Churchill acted with urgency, as he argued for action even before the War Council reached full agreement, and he directed preparations for the naval bombardment even with limited support between departments.
Some naval officers warned that mines and shore defences posed major risks.
Churchill still maintained that rapid movement and continued gunfire would overwhelm the Ottomans.
He pressed Admiral Carden to begin operations in February and continued to support the campaign even after early setbacks.
Internal arguments within the Admiralty, especially between Churchill and Admiral Fisher, worsened as losses mounted.
Fisher had previously supported the plan with caution and resigned in protest on 15 May 1915, and this started a political crisis that weakened Churchill’s position in the government.
After the naval failure, Churchill helped push for a land invasion and supported the creation of the Mediterranean Expeditionary Force under General Ian Hamilton.
While Churchill held no command authority over army operations, he remained vocal in cabinet meetings and encouraged continued offensives.
As the situation worsened, criticism grew louder. Although multiple offices shared responsibility for the unfolding disaster, Churchill’s role as the campaign’s main supporter made him an easy target for blame.
By May 1915, he lost his post in the Admiralty and stepped down from the cabinet during the coalition change.
Later, he tried to restore his name when he took command of a battalion on the Western Front in 1916.
Why was Gallipoli a disaster?
Gallipoli failed due to a long series of strategic mistakes tied to supply weakness and flawed assumptions that many leaders had accepted too readily.
First, Allied leaders underestimated Ottoman strength and readiness. Their intelligence proved inaccurate in key areas, and they had relied on the false belief that naval gunfire alone could clear the strait.
The initial attacks lacked mine-clearing vessels with proper protection, and naval commanders failed to anticipate that defenders could re-lay mines under cover of darkness.
Next, the landings occurred, in many cases, with poor coordination and vague objectives.
Allied commanders launched assaults on beaches far apart without adequate scouting or understanding of local geography.
At ANZAC Cove, soldiers faced steep ridges that blocked inland movement, while at Cape Helles, British units encountered fortified positions and concentrated fire.
Commanders had relied on outdated maps from the 1850s that did not accurately show the peninsula’s terrain, while Ottoman forces, already reinforced and well-positioned, inflicted high casualties before the Allies could gain a foothold.
Troops struggled to move beyond the shoreline, and within days, trench warfare replaced hopes of rapid advance.
Conditions worsened as the campaign dragged on. Supply chains often broke down, and many soldiers lacked clean water and adequate supplies of food and medical stores.
Medical evacuation was slow and disorganised, with overloaded hospital ships and too few casualty clearing stations.
Illness spread quickly, with dysentery and heat exhaustion, which reduced unit strength even when fighting stalled.
Meanwhile, Ottoman commanders rotated fresh units into the front lines and launched counterattacks that reversed Allied gains.
Allied leadership struggled to adapt to these conditions. Hamilton delayed critical decisions and resisted evacuation until it became unavoidable.
At the same time, political leaders failed to offer clear support. Reinforcements were limited, communication between departments remained slow, and responsibility for overall strategy remained divided.
Without a clear command structure or unified direction, the campaign stalled.
When the withdrawal order finally came in December, it ended a costly operation that had achieved nothing of its original purpose.
The evacuation was carried out between December 1915 and January 1916 and succeeded without loss of life at ANZAC and Suvla, and the final evacuation at Cape Helles involved some casualties and looked very different from the chaos that had come before it.
Is Churchill to blame for the disaster?
Churchill’s influence over the campaign’s origin and early stages was very clear. He proposed the naval assault and promoted it in War Council meetings, then dismissed many of the objections raised by senior naval officers.
His drive to force the issue, even when internal splits within the Admiralty grew, showed both his belief and his disregard for official caution.
In that sense, his judgement contributed in part to the early and poorly prepared launch of the Dardanelles operation.
Even so, several key failures occurred beyond his reach. Once the naval operation stalled and the campaign shifted to a land-based invasion, control passed to the War Office and to General Hamilton.
Hamilton mismanaged key parts of the landings and failed to react to tactical challenges, which left him unable to lead a flexible or responsive campaign.
Meanwhile, Lord Kitchener, who oversaw army operations, delayed vital decisions and withheld reinforcements.
Senior figures across the British government failed at times to support or coordinate the campaign, which allowed rivalries and confusion to weaken any clear strategy.
Importantly, the entire War Council approved the plan, and no one stopped it once the warning signs became clear.
Churchill’s idea won backing from Prime Minister Asquith and many others who believed the Western Front had become too static.
That shared endorsement spread responsibility across departments, even as Churchill became the public face of the campaign.
When the government reduced the War Council’s role by mid-1915, and in June it was replaced by the smaller Dardanelles Committee, clear direction stayed hard to find, and delays continued.
He took the brunt of criticism because he had promoted the operation so forcefully and continued to defend it well after its failure became obvious.
Yet the wider system of British wartime planning also failed. Strategic overconfidence and fractured leadership left the operation without proper logistical preparation and doomed it well before the first shots were fired.
Churchill contributed to the disaster, but he did not act alone, and the failure at Gallipoli showed a much wider breakdown across Britain’s wartime leadership.