
Spitfire versus the Messerschmitt 109: which was the better combat aircraft?
At the height of the Second World War, two fighter aircraft repeatedly met above Britain, where their pilots fought not just for survival, but for control of the air.
The Supermarine Spitfire and the Messerschmitt Bf 109 did not simply stand for their own air forces, and they showed the highest level of aircraft design that Britain and Germany had developed during the 1930s.
Between 10 July and 31 October 1940, these two fighters encountered each other almost daily in the skies over southern England, and although both earned reputations for speed and deadliness, only one could prove more consistently effective in actual combat conditions.
Over the course of the campaign, both sides flew tens of thousands of sorties, with more than 1,700 Luftwaffe aircraft lost and nearly 1,000 RAF fighters destroyed, most of which were Spitfires and Hurricanes operating under Fighter Command.
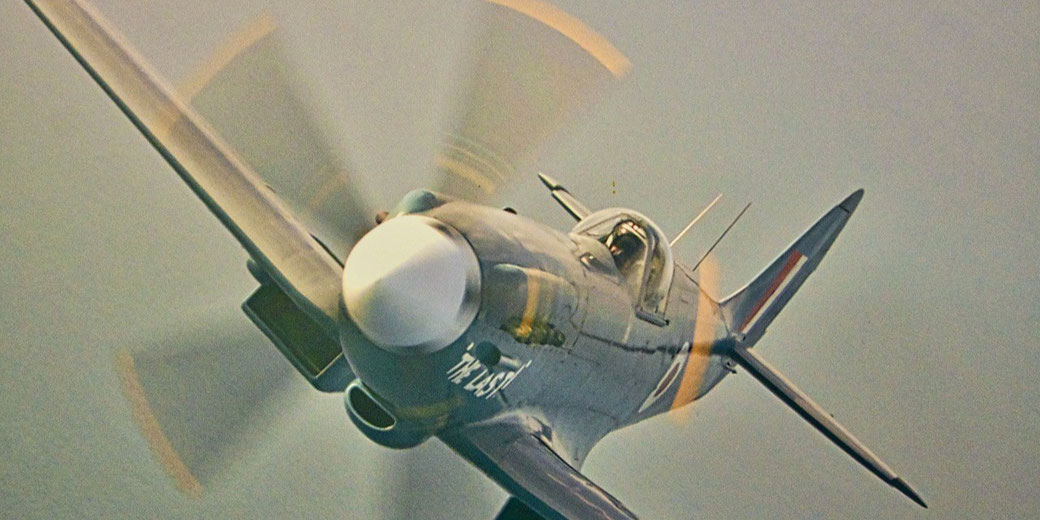
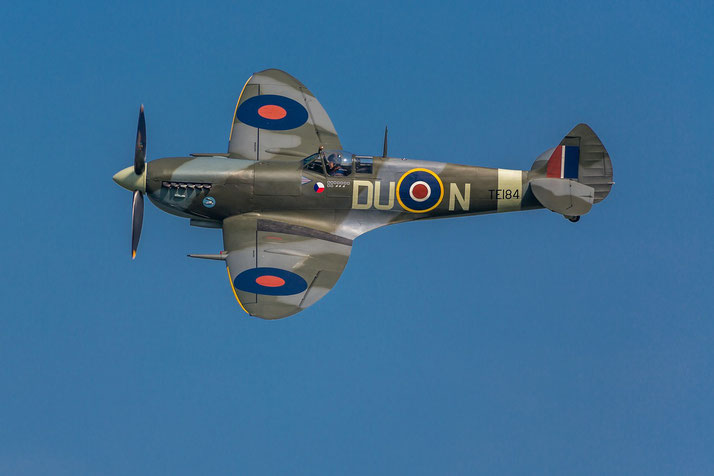
Contender 1: the Submarine Spitfire
Originally designed in response to Air Ministry Specification F.10/35, the Spitfire grew out of the Supermarine company’s earlier experience in high-speed racing aircraft.
Designed by R. J. Mitchell, who had previously overseen Supermarine’s Schneider Trophy-winning entries, the Spitfire incorporated advanced aerodynamics and all-metal stressed-skin construction.
On 5 March 1936, the prototype first took flight and impressed observers with its speed and balance, along with the clean lines of its form.
For structural design, the aircraft used an all-metal monocoque fuselage paired with a distinctive elliptical wing, which allowed low drag and excellent lift across a broad surface area.
The early Mk I variant entered service in 1938 and mounted eight .303-inch Browning machine guns in the wings.
Each gun fired at over 1,000 rounds per minute, which produced a very heavy burst of fire when pilots fired short bursts.
At the time, this armament gave British pilots a noticeable edge against lightly protected enemy aircraft.
Powered by a Rolls-Royce Merlin II or III engine that produced around 1,030 horsepower, the Spitfire Mk I reached a top speed of over 360 miles per hour at altitude.
However, the Merlin relied on a carburettor-fed fuel system. As a result, the engine lost power under negative g, which affected manoeuvrability in nose-down dives.
Engineers later reduced this problem with Miss Shilling’s orifice, which restricted fuel flow and helped keep the engine running properly during sharp manoeuvres, and this fix had only come into widespread use by early 1941.
Importantly, pilots consistently praised the Spitfire’s flight handling in contemporary accounts.
The aircraft responded smoothly to control inputs, maintained stable firing conditions, and sustained tight turns at medium altitude.
Visibility from the early canopy remained somewhat restricted, particularly forward on the ground and to the rear in flight, and the aircraft’s low wing loading and excellent way the controls worked together allowed pilots to push it hard so that they did not lose control.
As war production expanded, British factories greatly increased output. The Castle Bromwich shadow factory began full-scale manufacturing in mid-1940 after it had overcome early production delays and management issues.
By the start of the Battle of Britain, approximately 260 Spitfires were available to Fighter Command.
By war’s end, over 20,000 Spitfires had been produced, and with each new mark, engineers upgraded the aircraft’s armament and engine performance, and they improved its ability to survive in combat.
These changes allowed it to remain competitive throughout the conflict. Later variants began with the Mk IIb and then continued with the Mk V and featured 20 mm Hispano cannons that gave RAF pilots the firepower needed to counter more heavily armoured enemy aircraft.
Contender 2: the Messerschmitt 109
Originally designed to meet a 1933 Luftwaffe requirement for a high-speed monoplane fighter, the Messerschmitt Bf 109 showed Germany’s strategic aim to control the skies with a modern, efficient fighter.
Willy Messerschmitt’s team at Bayerische Flugzeugwerke designed the prototype Bf 109 V1, which first flew in 1935 and used a British Kestrel engine.
Once German engine development had caught up, the aircraft quickly evolved into a capable front-line fighter.
Critically, the Spanish Civil War provided the Luftwaffe with an ideal testing ground.
Bf 109Bs and Cs had flown with the Condor Legion from 1937 and had built up combat experience against Soviet-built fighters.
German pilots had improved tactics such as high-speed diving attacks and the “finger-four” formation, which became Luftwaffe doctrine in the years ahead.
That experience had influenced the design and tactics of the Bf 109E, which entered mass service in 1939.
Structurally, the Bf 109E used a compact airframe, narrow-chord wings with automatic leading-edge slats, and an all-metal stressed-skin fuselage.
The slats moved out automatically during high angles of attack, delaying stall and improving handling at low speeds.
However, its undercarriage design was narrow and mounted close under the fuselage and caused serious problems, which meant that many aircraft suffered ground accidents during take-off and landing, especially on poorly prepared fields.
The Bf 109E was powered by the Daimler-Benz DB 601A engine, which produced around 1,100 horsepower and used direct fuel injection.
Therefore, German pilots experienced no power loss during negative g manoeuvres, which allowed quick dives so that pilots could break away or move back into a better position during combat.
In terms of firepower, the E-3 variant carried two MG 17 machine guns above the engine and two 20 mm MG FF cannons in the wings, while the E-4 introduced the improved MG FF/M cannons that offered better reliability and ammunition handling.
Later models introduced the MG 151/20 cannon, which provided even greater reliability and increased the damage they caused.
Luftwaffe pilots generally valued the Bf 109 for its climbing ability and rapid acceleration, as well as the concentrated armament in its nose and wings.
Admittedly, the early cockpit canopy and raised rear fuselage limited rear visibility, but subsequent models improved that shortcoming.
Notably, the Bf 109 remained in production throughout the war in many improved versions.
German factories produced more than 30,000 aircraft over the entire conflict, of which only around 1,200 to 1,300 were operational at the start of the Battle of Britain.

Design comparison
Both aircraft came from similar military requirements, yet their designs showed somewhat different national ideas about how to design fighters.
The Spitfire’s elliptical wing, although more difficult to manufacture, offered better performance in the air and gentle stall characteristics.
In contrast, the Bf 109’s compact, tapered wing prioritised speed and rapid climb at the cost of some manoeuvrability.
From a production point of view, the Bf 109’s simpler wing structure allowed quicker production in separate factories, an important advantage as German war industry spread out.
Meanwhile, the Spitfire’s more complicated structure needed more accuracy and labour, yet gave pilots a smoother flying experience.
As a result, RAF pilots benefited from greater control at high speeds and in tight turns, especially during interceptions over home territory.
For undercarriage design, the Spitfire’s wide-track gear offered better ground stability, particularly during landings in poor weather.
The Bf 109’s narrow-track gear, although lighter and aerodynamically efficient, resulted in more frequent landing accidents and demanded greater skill from pilots during take-off.
Additionally, the Bf 109’s centralised fuel tank location increased the risk of fire when hit, which added to the aircraft’s risk in long fights.
In cockpit layout, the Spitfire offered more internal space and a control layout that was easier to use, including a side-mounted throttle and clearly organised instruments.
As mentioned previously, the Bf 109’s cockpit was narrower and more cramped, with the throttle on the right and a layout that German pilots needed to learn quickly during rushed wartime training.
Vision to the rear was poor in both early models, though the Spitfire’s bubble canopy came later and provided a clearer view during combat.
At higher altitudes, oxygen systems became essential, and faults in the Bf 109’s early systems occasionally led to pilot blackouts during long climbs.
In terms of armament, the Bf 109E delivered greater firepower per shot due to its wing-mounted 20 mm cannons, which could disable enemy bombers with fewer hits.
The Spitfire Mk I relied on eight rifle-calibre machine guns, which gave high volume but lower damage per round.
RAF designers later corrected this with the introduction of cannon-armed Spitfires, beginning with the Mk IIb and continuing with later marks.
Performance comparison
In raw speed, the Spitfire Mk I and Bf 109E matched each other closely, both reaching speeds around 360 miles per hour at operational altitudes.
At first glance, neither aircraft dominated in terms of maximum speed. However, the Bf 109’s higher climb rate, around 3,280 feet per minute compared to the Spitfire Mk I’s 2,530, allowed Luftwaffe pilots to enter combat from a position of height, which let them break away quickly or carry out aggressive diving attacks.
The Spitfire, by contrast, often excelled in turning engagements. Its generous wing area and low wing loading gave it a sharper turning circle, particularly around 15,000 to 20,000 feet.
RAF instructors emphasised this strength in training, and they encouraged pilots to engage in sustained turning fights where the Spitfire’s agility often decided the outcome.
While the Spitfire had excellent side-to-side response, its roll rate was slower than the Bf 109, which limited its ability to rapidly change direction in vertical manoeuvres.
Fuel system differences also had clear effects in battle. The Bf 109’s fuel-injected engine gave German pilots greater freedom to dive suddenly or roll out of danger, while early Spitfires with carburettor-fed Merlins lost power under negative g.
Until engineers implemented a fix, British pilots often had to roll inverted before diving, which wasted time and left them open to attack.
Range became one of the most important practical differences in many engagements.
The Spitfire’s range was roughly 395 km and allowed it to stay in the air longer above home territory.
In contrast, the Bf 109 flew close to its maximum fuel range when escorting bombers over England.
Most German fighters had no more than 20 minutes of time in combat before fuel levels forced their return across the Channel, which often broke off engagements at critical moments.
When pilots pulled out of dives and when they managed speed and height, both aircraft performed well, yet they required experience to master.
The Spitfire’s controls grew heavier at very high speeds, though the aircraft responded predictably.
The Bf 109 handled well in the vertical, and its ability to accelerate in a dive made it especially dangerous when used in fast attack runs.
Action in combat during the Battle of Britain
Between July and October 1940, Spitfires and Bf 109s met repeatedly in dogfights above southern England, where both sides adapted tactics to the fast pace of the air war.
RAF Fighter Command assigned Spitfires to engage enemy fighters, while Hurricanes tackled the bombers, and they used sector-based radar control to intercept incoming raids.
That tactical division matched the Spitfire’s agility and handling characteristics, which made it better suited for direct engagement with the Bf 109.
German pilots flew from bases in France and had to balance escort duties with the aforementioned fuel limitations.
After they throttled back to fly alongside bombers, they often had little time for long fights.
When RAF fighters arrived, Bf 109s had to accelerate and climb rapidly to intercept, frequently while under fire.
Despite their aircraft’s powerful climb and firepower, German units faced a steady loss of aircraft and crews that proved difficult to sustain.
RAF aces such as Sailor Malan and Douglas Bader used their Spitfires’ turning capabilities and stability in level flight to deliver accurate gunnery.
German counterparts, who included Adolf Galland, relied on boom-and-zoom tactics and surprise attacks from altitude, and they used the 109’s excellent climb and negative-g freedom.
Galland reportedly replied, "a squadron of Spitfires," when asked what he needed most to win the air war, a remark later confirmed in interviews, though delivered with irony.
Both aircraft often enabled skilled pilots to win victories, though the circumstances of combat often favoured the British.
Over time, the rate of replacements and the pace of operations decided the outcome because RAF pilots who bailed out over England often returned to duty quickly, provided they escaped injury and aircraft remained available.
German pilots shot down over British territory were captured or killed, and Luftwaffe units soon began to lose experienced leaders.
During the campaign, British factories sustained fighter production, and debates such as the one over the "Big Wing" strategy between Leigh-Mallory and Park highlighted how the RAF's approach to interception developed during the campaign.
In many cases, the Spitfire’s technical strengths combined with a favourable operational context to increase its effectiveness across the campaign.
What can be concluded?
When judged purely on design and performance, the Spitfire and the Bf 109 offered different responses to the same problem.
The Bf 109 delivered powerful climb and heavy armament, and its ability to climb and dive quickly made it ideal for fast attacks and quick withdrawal.
The Spitfire prioritised turn rate and handling stability, and it offered endurance in combat that proved better suited to Britain’s defensive strategy in 1940.
In actual use, the Spitfire fitted better into the RAF’s home-defence system, which was supported by radar stations and centralised control, together with a network of local airfields.
Despite its initial weaknesses in negative-g handling and limited punch per round, it made up for these issues with reliability, manoeuvrability, and range.
The Bf 109 remained a deadly adversary throughout the campaign, yet fuel restrictions and poor strategic use reduced its overall impact, and growing loss of pilots made those problems worse.
The Hurricane, meanwhile, accounted for much of the Luftwaffe losses, but the Spitfire’s engagements with German fighters made it central to countering the threat posed by the Bf 109.
As a result, the Spitfire’s contribution to British survival during the Battle of Britain cannot easily be overstated, and in the specific conditions of the 1940 air war, it proved to be the more effective combat aircraft because it operated as part of a system that brought together fighters, radar, and control and used its strengths to full advantage.