
Why was Operation Market Garden a disaster?
In mid-September 1944, as Allied armies pushed through Belgium and reached the Dutch border, commanders believed they could deliver what they saw as a final blow to the German front that was collapsing.
British Field Marshal Bernard Montgomery proposed a daring attack that aimed to seize key river crossings in the Netherlands and bypass the heavily defended Siegfried Line.
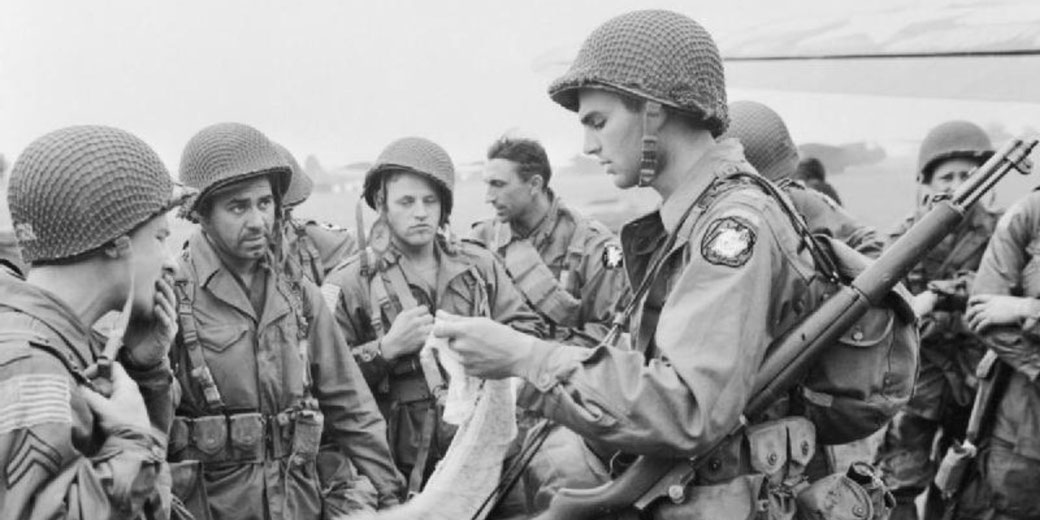
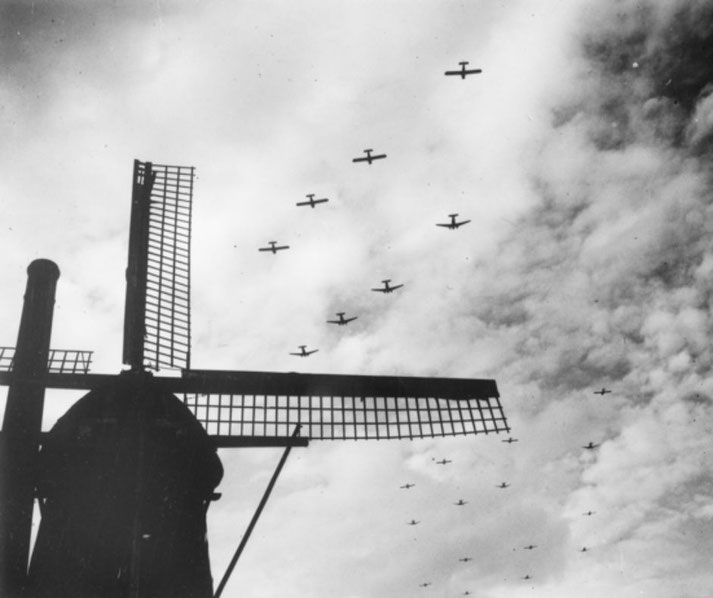
Codenamed Operation Market Garden, the plan involved over 41,000 airborne troops who had landed behind enemy lines while British tanks raced along a single road to reach them.
However, within ten days, the operation had failed, and the costly defeat revealed a series of serious flaws in Allied strategy and intelligence.
Strategic overconfidence
At its core, Operation Market Garden depended on the belief that, in their view, one single heavy attack could end the war more quickly than a broad-front approach.
Montgomery convinced General Eisenhower to commit a large amount of resources to his plan, which required a chain of five major bridges to be captured and held by airborne forces.
Meanwhile, British XXX Corps would advance north from the Belgian border, and they would use a single highway to relieve the paratroopers and push into the German Ruhr.
Already during the planning phase, senior officers expressed doubts. General Frederick Browning was the commander of the British airborne forces and was later reported to have remarked, "I think we might be going a bridge too far."
Several intelligence briefings had warned that the 9th and 10th SS Panzer Divisions were refitting near Arnhem.
Dutch resistance reports and aerial reconnaissance had confirmed the presence of German armour, but Montgomery’s staff dismissed these sources and described German forces in the Netherlands as fragmented and disorganised, incapable of resisting a fast advance.
The belief that speed and surprise would prevent a serious counterattack influenced every aspect of the plan.
However, the entire operation rested on narrow time limits and tight coordination.
Due to aircraft shortages and concerns about overcrowding at landing zones, the airborne troops could not all be dropped on the first day as originally planned.
As a result, each division would land in waves, which stretched their arrival over three days and prevented them from operating at full strength early on.
That delay had given German defenders time to regroup and move into new positions, which increased the pressure on the ground offensive to reach the furthest bridge at Arnhem without interruption.
The single road dilemma
At the operational level, Market Garden failed to account for the weakness of its only supply route.
The road from the Belgian border to Arnhem, known as "Hell's Highway," included several elevated sections with soft shoulders, but also passed through towns and dykes, as well as the surrounding farmland.
Once XXX Corps began its advance on 17 September, even relatively minor problems caused major delays.
Destroyed bridges, ambushed convoys, or broken-down vehicles blocked the route and forced engineers to make repairs under fire.
For instance, at Son, American paratroopers reached the bridge just as German forces detonated it.
British engineers rushed forward and assembled a Bailey bridge under enemy fire, but the delay stalled XXX Corps for more than 12 hours.
North of that, the 82nd Airborne Division faced difficulties when they tried to hold Nijmegen.
Only after two days of fighting did Allied troops launch a dangerous assault across the Waal River.
As they crossed in fragile canvas boats under heavy fire, the Germans reinforced the northern bank and prepared for further resistance at Arnhem.
That single crossing resulted in around 200 Allied casualties.
By then, the entire advance had already slowed. German units launched counterattacks against the flanks of the highway, and they repeatedly cut supply convoys and isolated forward elements.
Medical units struggled to evacuate the wounded. Ammunition deliveries arrived too late or too low.
Since no parallel roads could support armour or heavy vehicles, every delay increased the risk to the airborne units that held exposed positions deep behind enemy lines.
The destruction of the British 1st Airborne Division
Most severe of all was the disaster at Arnhem. Due to limited landing zones, British aircraft dropped the 1st Airborne Division more than 15 kilometres from their primary target, the road bridge over the Lower Rhine.
A single battalion, 2nd Battalion, the Parachute Regiment, under Lieutenant Colonel John Frost, reached the bridge and established a defensive perimeter, but German reinforcements quickly surrounded the position.
Elsewhere, scattered units faced growing resistance as they attempted to fight through the town.
Radio equipment malfunctioned across multiple units, which left commanders without reliable contact between battalions.
As a result, paratroopers lacked coordination, and some never received orders to move toward the bridge.
German tanks and artillery targeted strongpoints with great accuracy, while British forces, who were equipped mainly with light weapons, struggled to hold their ground.
Reinforcements could not reach Frost’s position, which remained under siege for several days.
Frost later recalled, "We held the bridge for as long as possible. We ran out of everything."
Eventually, XXX Corps reached the southern bank of the Rhine, but by that stage, the British paratroopers had run out of ammunition.
German forces overran the bridge defenders on 21 September, and the remaining airborne troops were either killed or captured.
Only about 2,200 men from the original 10,600 escaped back across the river.
More than 1,500 had been killed, and the rest were taken prisoner. For the British Army, the loss of the 1st Airborne Division delivered a very serious emotional and strategic blow.
German determination and command response
Within hours of the first landings, German commanders quickly grasped the likely scale of the operation.
Field Marshal Walter Model had his headquarters in Oosterbeek near Arnhem and responded immediately.
He ordered nearby divisions, including the II SS Panzer Corps, to redeploy and contain the airborne troops before they could consolidate.
General Wilhelm Bittrich and General Heinz Harmel coordinated the use of experienced panzer and mechanised units to isolate the Allied advance.
The rapid response, combined with veteran units that were drawn from the Eastern Front, caught the Allies off guard.
Since the Germans held the initiative by the second day, they mounted repeated counterattacks that cut communications and overran drop zones, which delayed reinforcements.
Armoured units launched direct assaults against paratroopers who were dug in around towns, while mobile artillery targeted road junctions and staging areas.
Even though German formations lacked full strength, they used the terrain and local transport, together with their superior firepower, to choke the Allied advance before it could reach its objectives.
German determination was supported by effective leadership and the ability to adjust on the battlefield and ensured that the operation remained under constant pressure.
Every delay on the Allied side created new opportunities for counterattack, and the German command exploited each one.
By the end of the first week, they had prevented the Allies from securing a crossing over the Rhine and inflicted very heavy casualties on airborne and ground units alike.
Consequences of the failure
By late September, the operation had fully collapsed. Of the 17,000 Allied casualties, the British 1st Airborne Division suffered the worst losses.
Arnhem remained in German hands, and the Rhine crossing, which had promised a direct path into Germany’s industrial areas, never happened.
German control over northern Holland continued into 1945. For Dutch civilians, especially those who lived in Arnhem and its surroundings, the consequences were terrible.
Thousands had been displaced, and in the months that followed, many starved during the Hunger Winter after the Germans cut off food and fuel supplies in retaliation.
After the failure, Allied strategy shifted. Eisenhower resumed his broad-front approach, and Montgomery’s influence over future offensives diminished.
American resources were diverted to support Patton’s advance into Lorraine.
Meanwhile, British airborne operations received stricter limitations, and no similar assault involving large-scale unsupported drops occurred again for the remainder of the war.
Even though American forces had crossed the Rhine at Remagen in early March 1945 after capturing the Ludendorff Bridge, the next major planned crossing did not take place until later that month during Operation Plunder and Operation Varsity.